Here is how to configure WinSCP for using it with Segfault:
You will first need to download it.
Follow through with the install process after downloading.
Connect to the segfault server for the first time via ssh. The command goes ssh root@segfault.net. Keep this open, we will need some info from the top of the screen.
Each new connection without a secret key will create a new instance with new sets of files. By doing the
SetEnv SECRET=xxyyzzpart, we are ensuring that we log back into the old instanceIf you have this set up already but want to access a different server, simply click on new site, and follow the setup again, except call it id_sf-sg-segfault-net-2 or something. Just add the right files and it will work.
To configure winSCP to connect to segfault, press control+N to get to the window in screenshot.

Run the below code in the server instance:
echo $SF_FQDN
Change tabs to the winSCP screen, and enter the result of the code above as hostname. For me it came out to sg.segfault.net, and that is what I have entered in the hostname tab.
Username is root and password is segfault. Save this for now, we’ll come back to this later.
When you ssh in for the first time, you will see some code like instructions at the top.

No part of this or this guide is optional, skipping/modifying carelessly causes problems.
Part 1.
For the first file, make a new file, called id_sf-de-segfault-net(name is important).
The contents should look similar to this(do not copy/paste, it will not work!):
-----BEGIN OPENSSH PRIVATE KEY-----
b3BlbnNzaC1rZXktdjEAAAAABG5vbmUAAAAEbm9uZQAAAAAAAAABAAAAMwAAAAtzc2gtZW
QyNTUxOQAAACB3jmp/3JyvY9ABgjrx4+sBnQ0T+yHsB4HTBMcJqC2OtgAAAIiJ9mzOifZs
zgAAAAtzc2gtZWQyNTUxOQAAACB3jmp/3JyvY9ABgjrx4+sBnQ0T+yHsB4HTBMcJqC2Otg
AAAEAs6YNqZSzAfZDl5/vDOB0vv7EZMxMUc/fEipuZ9A3eCHeOan/cnK9j0AGCOvHj6wGd
DRP7IewHgdMExwmoLY62AAAAAAECAwQF
-----END OPENSSH PRIVATE KEY-----
Make these files anywhere, we will be copying both of them to
C:\Users\(yourusername)\.ssh
For the second file, it’s largely the same.
Part 2.
Create a file called config, and inside that, put the code from your server’s login screen, shown in (of the picture above)
The contents should look similar to this (do not copy/paste, it will not work!):
host conductmesh
    User root
    HostName sg.segfault.net
    IdentityFile ~/.ssh/id_sf-sg-segfault-net
    SetEnv SECRET=xxyyzz
The .ssh folder below might not appear if you do not have hidden files checked. Do that, or alternatively, swap out (yourusername) with, you guessed it, your windows username, and put that in the file explorer’s address bar.
The keen eyed among you will have noticed the file created in Part 1(aka the private key) is being called by the file we are naming config as IdentityFile
Finally
Put the above made files(id_sf-de-segfault-net and config) in C:\Users\(yourusername)\.ssh folder.
For the time being, we will go back to the config file we created, and there, we will copy a line of code going SetEnv SECRET=xxyyzz. If you do not have a clipboard manager, save this, we will need this line a while later(very important. Do not modify the line either.)
On opening winSCP, you will notice a login screen(if you do not, or you accidentally closed it, press control+N). Go back to the old site you saved, click on edit:

And then go to advanced.

At the bottom, you will see putty terminal settings.

You will have to type in the SetEnv SECRET=xxyyzz you copied earlier into this field.
Now, after this is done, go to Tunnel(under Connection), you will see the following:

Put the hostname in from earlier in the guide, username is root and password is segfault
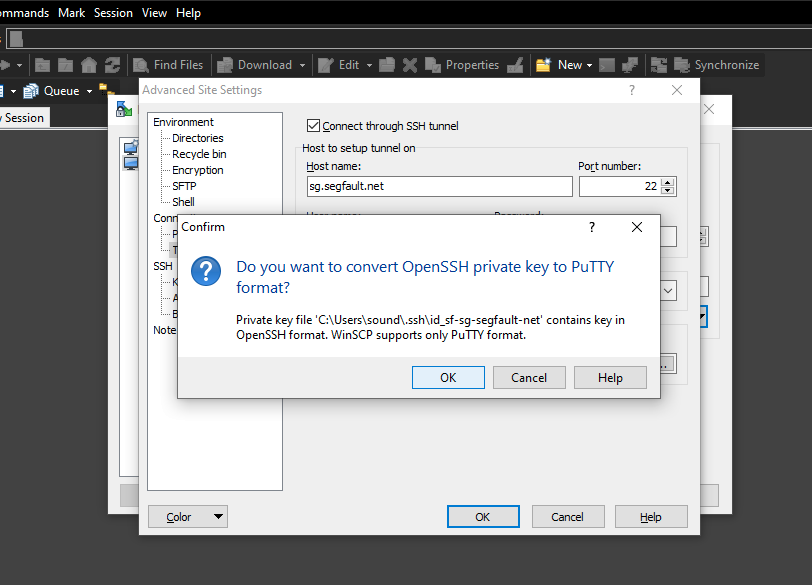
Press on the button that the helpful red arrow is pointing to, and you will see an explorer pop up. You have to select all files(filetype) according to the pictures.

Now select the id_sf-sg-segfault-net file that we just created at the beginning.
It will show an error that the openSSH format is not supported, and instead helpfully converts it to PuTTY format. Click on ok, that is desired.
It will now open explorer one last time*, and you select this file that just got created.

We are getting close to the end, last part, promise.
Now go to to Authentication under SSH.

And then select the fun little button that opens up explorer from before again!

Click on the open button, and everything should sort itself out. Click on Ok now.

Finally, click save, and then login.


You should see this if all went well.


Contact
bksy: @hackerschoice.bsky.social
Mastodon: @thc@infosec.exchange
Telegram: https://t.me/thcorg
Web: https://www.thc.org
Medium: https://medium.com/@hackerschoice
Hashnode: https://iq.thc.org/
Abuse: https://thc.org/abuse
E-Mail: members@proton.thc.org
Signal: ask
SimpleX: ask